Good news everyone! I’ve managed to get Nuki Opener working with my GDX-5.
Caveats
- As with the Klevio solution and other intercoms on this forum, you will have to Dial your property first before the “Open” function works. This will NOT work without dialling first. Features such as
Ring-to-Openwork perfectly. My personal preference is enabling notifications and just using the ‘Open’ notification action on my Android phone. - Implicit Ring Suppression: The built in ring of the intercom will be disabled. You’ll have to rely on the Nuki Opener itself and phone notifications for your doorbell.
- The Opener ring will chime multiple times after opening, because of the way the hack works.
- Guests who use the intercom to ring, won’t hear a dialling noise anymore on the other end and instead will see “CALL ANSWERED”.
- You will need to do some soldering. I had never soldered in my life before(!), but bought a £15 kit from amazon and managed to do it with help from YouTube. It’s not hard however there are not nice solder points to do this, so you have to be careful not to touch any other contact points.
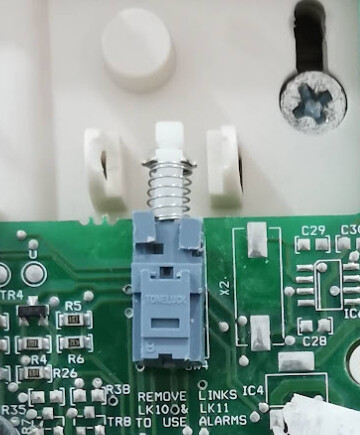
- I have a very old model of the GDX-23121 (from 2005 i think), which has LEDs seperate from the buttons. @galen’s looks to be from 2016. This makes the soldering a bit easier for me, however it should be possible in the new models too. Someone on this thread will have to test. I recommend you get a friend to hold the cables in place before soldering to see that it works.
How it works
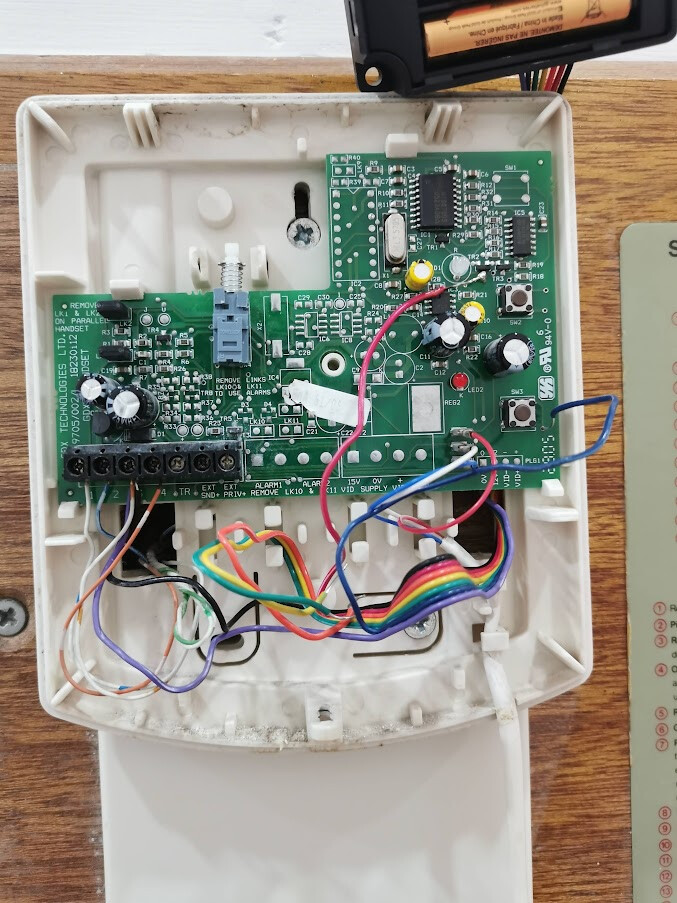
- I keep the phone on the hook all the time, so the handset doesn’t have to be lifted anymore. This is done by disabling the hangup switch
- I use Nuki’s hidden Analog mode, which is enabled by developer support. Instead of trying to use the Opener to send and recieve Digital Signals from Terminals 1/2, we read and send signals directly to the PCB. For ring detection, we use the Green light which activates when someone rings. For Opening, we send a signal directly to the “Enter” button on the Intercom. Because the Green light bleeps repeatedly when opening, this does cause some additional chimes from the Nuki Opener.
Step 1: Enable Analog Mode by contacting Nuki support
Note: It is advisable to do this on a Weekday so Nuki support can respond quickly - e.g. Monday am
- Set your Opener Admin pin to 1234
- Go to the Manage Users screen, and invite a new user, which will give you an invite link like this
https://nuki.io/invite/ABC-DEF-GHI. Note, this invite code only lasts 48 hours so I recommend you do this early on during the working week.
Contact contact@nuki.io with the following message:
Step 2: Remove the hang up button
This whole thing works by keeping the phone on the hook all the time. This enables the “Open” button to work without having to lift the handset.
Use a small flathead screwdriver (I used the one that came with the Nuki Opener) to pry the plastic hangup button up from the prongs on either side. This should be really easy, and you can always reinstall it if you want to return it to previous behaviour.
Step 3: Delay Settings
In the Nuki app, i have my settings as follows:
- Opening duration: 3 seconds
- Opening delay: 1 second
I think you should be able to reduce these, but they work for me so I didn’t bother tweaking them.
Step 4: Wiring (including soldering)
Summary of wiring
| Nuki cable | Terminal/Component | Description |
|---|---|---|
| Purple | Terminal 3 | This is the ground wire for Ring detection |
| Black | Terminal 3 | This is the ground wire for Open simulation |
| Red | LED1/LED1B: Solder to G pin.OR TR2: Solder to bottom-pin |
This is for Ring detection. We use the Green LED for Ring detection, and you’ll need to solder to the Pin. For my older GDX model, I used a nearby connected pin rather than the LED itself (bottom of TR2) because this was an easier solder point, but the principle is the same. |
| Blue | SW3: Solder to top-right pin | This is for simulating the “Enter” button. On my older GDX model, I didn’t even need to solder this because there was a Pin-hole ready for me to use |
After soldering
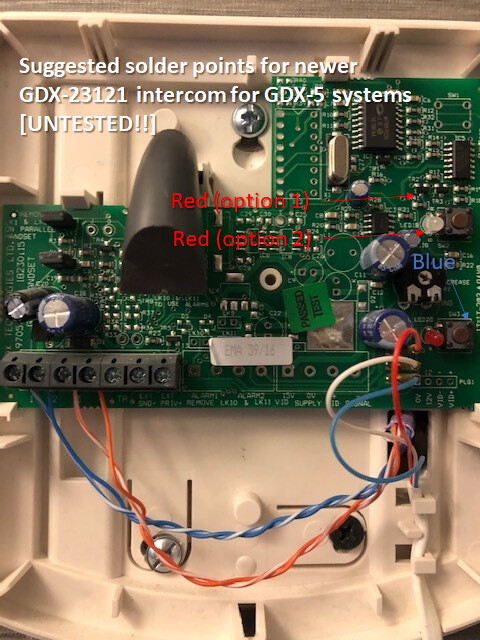
My predicted image for newer models
Based on @galen’s image, here is where i think you should solder on newer models. Like i said above, I recommend you test this by holding the contacts in place manually with a friend first before soldering!
And that’s it! Good look everyone. I just got this all working today and have tested myself but will see how things go with time.